移动端图片上传旋转、压缩的解决方案 | 林鑫的博客-前端博客-web前端技术

移动端图片上传旋转、压缩的解决方案

在手机上通过网页 input 标签拍照上传图片,有一些手机会出现图片旋转了90度d的问题,包括 iPhone 和个别三星手机。这些手机竖着拍的时候才会出现这种问题,横拍出来的照片就正常显示。因此,可以通过获取手机拍照角度来对照片进行旋转,从而解决这个问题。

Orientation

这个参数并不是所有图片都有的,不过手机拍出来的图片是带有这个参数的。

旋转角度 参数值
1
顺时针90° 6
逆时针90° 8
180° 3

参数为 1 的时候显示正常,那么在这些横拍显示正常,即 Orientation = 1 的手机上,竖拍的参数为 6。

想要获取 Orientation 参数,可以通过 exif.js 库来操作。exif.js 功能很多,体积也很大,未压缩之前足足有 30k,这对手机页面加载来说是非常大影响的。而我只需要获取 Orientation 信息而已,所以我这里删减了 exif.js 库的一些代码,将代码缩小到几KB。

exif.js 获取 Orientation :

1
2
3
EXIF.getData(file, function() {
var Orientation = EXIF.getTag(this, 'Orientation');
});

file 则是 input 文件表单上传的文件。上传的文件经过 fileReader.readAsDataURL(file) 就可以实现预览图片了,这方面不清楚的可以查看:HTML5 进阶系列:文件上传下载

旋转

旋转需要用到 canvas 的 rotate() 方法。

1
ctx.rotate(angle);

rotate 方法的参数为旋转弧度。需要将角度转为弧度:degrees * Math.PI / 180

旋转的中心点默认都在 canvas 的起点,即 ( 0, 0 )。旋转的原理如下图:

旋转原理图

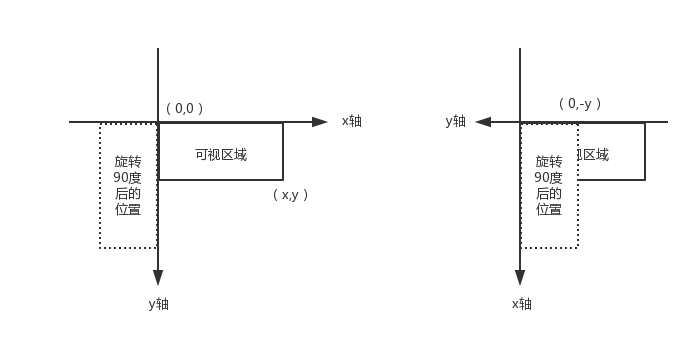
旋转之后,如果从 ( 0, 0 ) 点进行 drawImage(),那么画出来的位置就是在左图中的旋转 90 度后的位置,不在可视区域呢。旋转之后,坐标轴也跟着旋转了,想要显示在可视区域呢,需要将 ( 0, 0 ) 点往 y 轴的反方向移 y 个单位,此时的起始点则为 ( 0, -y )。

同理,可以获得旋转 -90 度后的起始点为 ( -x, 0 ),旋转 180 度后的起始点为 ( -x, -y )。

压缩

手机拍出来的照片太大,而且使用 base64 编码的照片会比原照片大,那么上传的时候进行压缩就非常有必要的。现在的手机像素这么高,拍出来的照片宽高都有几千像素,用 canvas 来渲染这照片的速度会相对比较慢。

因此第一步需要先对上传照片的宽高做限制,判断宽度或高度是否超出哪个范围,则等比压缩其宽高。

1
2
3
4
5
6
7
8
var ratio = width / height;
if(imgWidth > imgHeight && imgWidth > xx){
imgWidth = xx;
imgHeight = Math.ceil(xx / ratio);
}else if(imgWidth < imgHeight && imgHeight > yy){
imgWidth = Math.ceil(yy * ratio);
imgHeight = yy;
}

第二步就通过 canvas.toDataURL() 方法来压缩照片质量。

1
canvas.toDataURL("image/jpeg", 1);

toDataURL() 方法返回一个包含图片展示的 data URI 。使用两个参数,第一个参数为图片格式,默认为 image/png。第二个参数为压缩质量,在指定图片格式为 image/jpeg 或 image/webp的情况下,可以从 0 到 1 的区间内选择图片的质量。

总结

综合以上,例子的代码包括精简的exif.js库地址:file-demo

主要的核心代码如下:

1
2
3
4
5
6
7
8
9
10
11
12
13
14
15
16
17
18
19
20
21
22
23
24
25
26
27
28
29
30
31
32
33
34
35
36
37
38
39
40
41
42
43
44
45
46
47
48
49
50
51
52
53
54
55
56
57
58
59
60
61
62
63
64
<input type="file" id="files" >
<img src="blank.gif" id="preview">
<script src="small-exif.js"></script>
<script>
var ipt = document.getElementById('files'),
img = document.getElementById('preview'),
Orientation = null;
ipt.onchange = function () {
var file = ipt.files[0],
reader = new FileReader(),
image = new Image();
if(file){
EXIF.getData(file, function() {
Orientation = EXIF.getTag(this, 'Orientation');
});
reader.onload = function (ev) {
image.src = ev.target.result;
image.onload = function () {
var imgWidth = this.width,
imgHeight = this.height;
// 控制上传图片的宽高
if(imgWidth > imgHeight && imgWidth > 750){
imgWidth = 750;
imgHeight = Math.ceil(750 * this.height / this.width);
}else if(imgWidth < imgHeight && imgHeight > 1334){
imgWidth = Math.ceil(1334 * this.width / this.height);
imgHeight = 1334;
}
var canvas = document.createElement("canvas"),
ctx = canvas.getContext('2d');
canvas.width = imgWidth;
canvas.height = imgHeight;
if(Orientation && Orientation != 1){
switch(Orientation){
case 6: // 旋转90度
canvas.width = imgHeight;
canvas.height = imgWidth;
ctx.rotate(Math.PI / 2);
// (0,-imgHeight) 从旋转原理图那里获得的起始点
ctx.drawImage(this, 0, -imgHeight, imgWidth, imgHeight);
break;
case 3: // 旋转180度
ctx.rotate(Math.PI);
ctx.drawImage(this, -imgWidth, -imgHeight, imgWidth, imgHeight);
break;
case 8: // 旋转-90度
canvas.width = imgHeight;
canvas.height = imgWidth;
ctx.rotate(3 * Math.PI / 2);
ctx.drawImage(this, -imgWidth, 0, imgWidth, imgHeight);
break;
}
}else{
ctx.drawImage(this, 0, 0, imgWidth, imgHeight);
}
img.src = canvas.toDataURL("image/jpeg", 0.8);
}
}
reader.readAsDataURL(file);
}
}
</script>